TrueFoundry AI Gateway Integration
What is Truefoundry? TrueFoundry is an enterprise-grade AI Gateway and control plane that lets you deploy, govern, and monitor any LLM or Gen-AI workload behind a single OpenAI-compatible API—bringing rate-limiting, cost controls, observability, and on-prem support to production AI applications.
How Truefoundry Integrates with Neural Inverse
Truefoundry’s AI Gateway and Neural Inverse combine to give you enterprise-grade observability, governance, and cost control over every LLM request—set up in minutes.
Unified OpenAI-Compatible Endpoint
Point the Neural Inverse OpenAI client at Truefoundry’s gateway URL. Truefoundry routes to any supported model (OpenAI, Anthropic, self-hosted, etc.), while Neural Inverse transparently captures each call—no code changes required.
End-to-End Tracing & Metrics
Neural Inverse delivers:
- Full request/response logs (including system messages)\
- Token usage (prompt, completion, total)\
- Latency breakdowns per call\
- Cost analytics by model and environment\
Drill into any trace in seconds to optimize performance or debug regressions.
Production-Ready Controls
Truefoundry augments your LLM stack with:
- Rate limiting & quotas per team or user\
- Budget alerts & spend caps to prevent overruns\
- Scoped API keys with RBAC for dev, staging, prod\
- On-prem/VPC deployment for full data sovereignty\
Prerequisites
Before integrating Neural Inverse with TrueFoundry, ensure you have:
- TrueFoundry Account: Create a Truefoundry account with atleast one model provider and generate a Personal Access Token by following the instructions in quick start and generating tokens
- Neural Inverse Account: Sign up for a free Neural Inverse Cloud account or self-host Neural Inverse
Step 1: Install Dependencies
%pip install openai langfuseStep 2: Set Up Environment Variables
Next, set up your Neural Inverse API keys. You can get these keys by signing up for a free Neural Inverse Cloud account or by self-hosting Neural Inverse. These environment variables are essential for the Neural Inverse client to authenticate and send data to your Neural Inverse project.
import os

# Neural Inverse Configuration
os.environ["LANGFUSE_PUBLIC_KEY"] = "pk-lf-..."
os.environ["LANGFUSE_SECRET_KEY"] = "sk-lf-..."
os.environ["LANGFUSE_BASE_URL"] = "https://cloud.langfuse.com"  # 🇪🇺 EU region
# Other Neural Inverse data regions include 🇺🇸 US: https://us.cloud.langfuse.com, 🇯🇵 Japan: https://jp.cloud.langfuse.com and ⚕️ HIPAA: https://hipaa.cloud.langfuse.com

# TrueFoundry Configuration
os.environ["TRUEFOUNDRY_API_KEY"] = "your-truefoundry-token"
os.environ["TRUEFOUNDRY_BASE_URL"] = "https://your-control-plane.truefoundry.cloud/api/llm"
from langfuse import get_client
# Test Neural Inverse authentication
get_client().auth_check()True
Step 3: Use Neural Inverse OpenAI Drop-in Replacement
Use Neural Inverse's OpenAI-compatible client to capture and trace every request routed through the TrueFoundry AI Gateway. Detailed steps for configuring the gateway and generating virtual LLM keys are available in the TrueFoundry documentation.
from langfuse.openai import OpenAI
import os

# Initialize OpenAI client with TrueFoundry Gateway
client = OpenAI(
    api_key=os.environ["TRUEFOUNDRY_API_KEY"],
    base_url=os.environ["TRUEFOUNDRY_BASE_URL"]  # Base URL from unified code snippet
)
Step 4: Run an Example
# Make a request through TrueFoundry Gateway with Neural Inverse tracing
response = client.chat.completions.create(
    model="openai-main/gpt-4o",  # Paste the model ID you copied from TrueFoundry Gateway
    messages=[
        {"role": "system", "content": "You are a helpful AI assistant specialized in explaining AI concepts."},
        {"role": "user", "content": "Why does an AI gateway help enterprises?"},
    ],
    max_tokens=500,
    temperature=0.7
)

print(response.choices[0].message.content)

# Ensure all traces are sent to Neural Inverse
langfuse = get_client()
langfuse.flush()
Step 5: See Traces in Neural Inverse
After running the example, log in to Neural Inverse to view the detailed traces, including:
- Request parameters
- Response content
- Token usage and latency metrics
- LLM model information through Truefoundry gateway
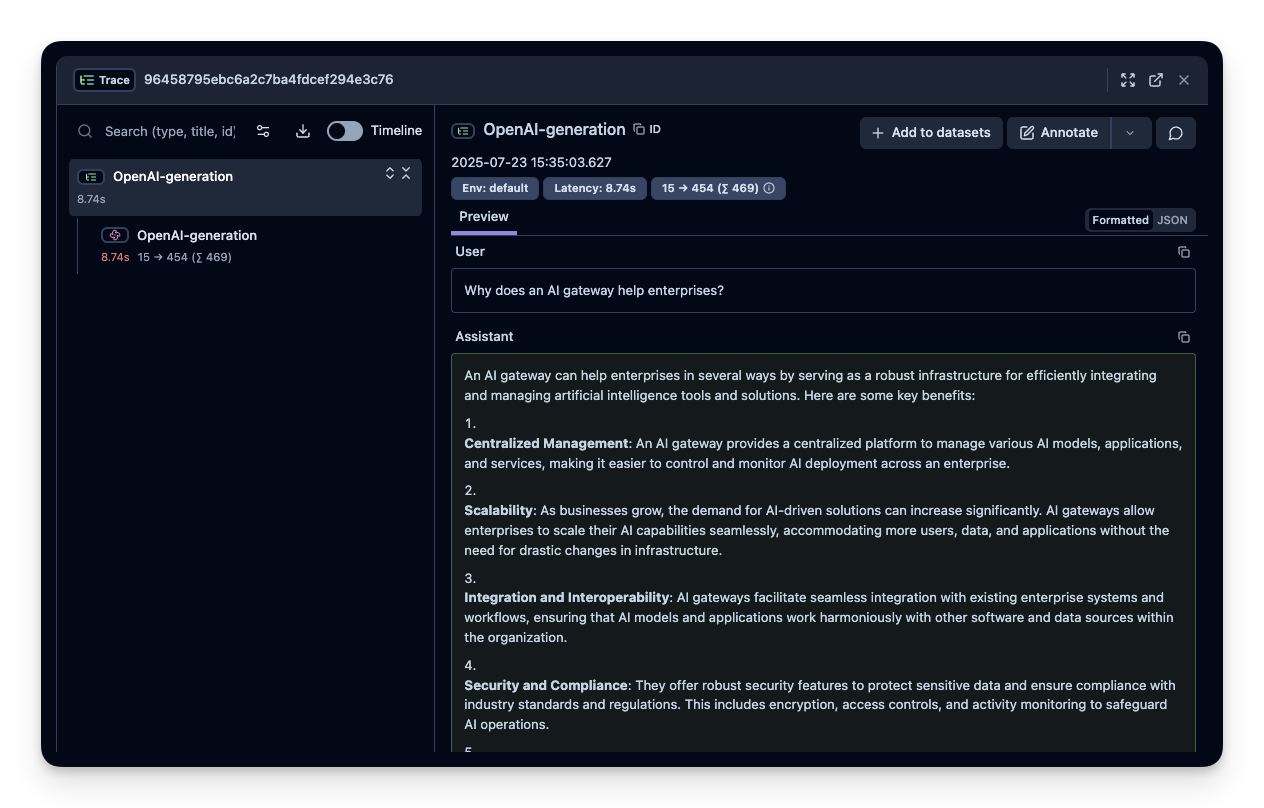
Note: All other features of Neural Inverse will work as expected, including prompt management, evaluations, custom dashboards, and advanced observability features. The TrueFoundry integration seamlessly supports the full Neural Inverse feature set.
Advanced Integration with Neural Inverse Python SDK
Enhance your observability by combining the automatic tracing with additional Neural Inverse features.
Using the @observe Decorator
The @observe() decorator automatically wraps your functions and adds custom attributes to traces:
from langfuse import observe, get_client, propagate_attributes

langfuse = get_client()

@observe()
def analyze_customer_query(query, customer_id):
    """Analyze customer query using TrueFoundry Gateway with full observability"""

    # Propagate attributes to all child observations
    with propagate_attributes(
        user_id=customer_id,
        session_id=f"session_{customer_id}",
        tags=["customer-service", "truefoundry-gateway"],
        metadata={"gateway": "truefoundry"},
        version="1.0.0"
    ):

        response = client.chat.completions.create(
            model="openai-main/gpt-4o",
            messages=[
                {"role": "system", "content": "You are a customer service AI assistant."},
                {"role": "user", "content": query},
            ],
            temperature=0.3
        )

        result = response.choices[0].message.content

    # Set input and output on the current observation
    langfuse.update_current_observation(
        input={"query": query, "customer_id": customer_id},
        output={"response": result},
    )

    return result

# Usage
result = analyze_customer_query("How do I reset my password?", "customer_123")
Debug Mode
Enable debug logging for troubleshooting:
import logging
logging.basicConfig(level=logging.DEBUG)Note: All other features of Neural Inverse will work as expected, including prompt management, evaluations, custom dashboards, and advanced observability features. The TrueFoundry integration seamlessly supports the full Neural Inverse feature set.
Learn More
- TrueFoundry AI Gateway Introduction: https://docs.truefoundry.com/gateway/intro-to-llm-gateway
- TrueFoundry Authentication Guide: https://docs.truefoundry.com/gateway/authentication
Interoperability with the Python SDK
You can use this integration together with the Langfuse SDKs to add additional attributes to the observation.
The @observe() decorator provides a convenient way to automatically wrap your instrumented code and add additional attributes to the observation.
from langfuse import observe, propagate_attributes, get_client

langfuse = get_client()

@observe()
def my_llm_pipeline(input):
    # Add additional attributes (user_id, session_id, metadata, version, tags) to all spans created within this execution scope
    with propagate_attributes(
        user_id="user_123",
        session_id="session_abc",
        tags=["agent", "my-observation"],
        metadata={"email": "user@langfuse.com"},
        version="1.0.0"
    ):

        # YOUR APPLICATION CODE HERE
        result = call_llm(input)

        return result

# Run the function
my_llm_pipeline("Hi")
Learn more about using the Decorator in the Langfuse SDK instrumentation docs.
The Context Manager allows you to wrap your instrumented code using context managers (with with statements), which allows you to add additional attributes to the observation.
from langfuse import get_client, propagate_attributes

langfuse = get_client()

with langfuse.start_as_current_observation(
    as_type="span",
    name="my-observation",
    trace_context={"trace_id": "abcdef1234567890abcdef1234567890"},  # Must be 32 hex chars
) as observation:

    # Add additional attributes (user_id, session_id, metadata, version, tags)
    # to all observations created within this execution scope
    with propagate_attributes(
        user_id="user_123",
        session_id="session_abc",
        metadata={"experiment": "variant_a", "env": "prod"},
        version="1.0",
    ):
        # YOUR APPLICATION CODE HERE
        result = call_llm("some input")

# Flush events in short-lived applications
langfuse.flush()
Learn more about using the Context Manager in the Langfuse SDK instrumentation docs.
Troubleshooting
No observations appearing
First, enable debug mode in the Python SDK:
export LANGFUSE_DEBUG="True"Then run your application and check the debug logs:
- OTel observations appear in the logs: Your application is instrumented correctly but observations are not reaching Langfuse. To resolve this:
- Call
langfuse.flush()at the end of your application to ensure all observations are exported. - Verify that you are using the correct API keys and base URL.
- Call
- No OTel spans in the logs: Your application is not instrumented correctly. Make sure the instrumentation runs before your application code.
Unwanted observations in Langfuse
The Langfuse SDK is based on OpenTelemetry. Other libraries in your application may emit OTel spans that are not relevant to you. These still count toward your billable units, so you should filter them out. See Unwanted spans in Langfuse for details.
Missing attributes
Some attributes may be stored in the metadata object of the observation rather than being mapped to the Langfuse data model. If a mapping or integration does not work as expected, please raise an issue on GitHub.
Next Steps
Once you have instrumented your code, you can manage, evaluate and debug your application:
Manage prompts in Langfuse
Add evaluation scores
Run LLM-as-a-judge Evaluators
Create datasets
Create custom dashboards
Test queries in the Playground
Last edited